I've been having a hard time getting the Uniden SDS100 serial over USB to work with my Windows virtual machine, but finally figured it out.
My virtual machine setup
Host Machine
Using VirtualBox with Oracle VM VirtualBox Extension Pack installed. The first thing you'll want to do after installing the Oracle VM VirtualBox Extension Pack is to enable USB via the virtual machine's settings. I selected USB 3.0, but depending on your use case, you may have to try another option.
Regarding logged user permissions: I added the user to the following groups: tty, dialout,vboxusers
Operating System: Pop!_OS (64bit)
Brand / Model Laptop: System 76 / Bonobo (13)
Guest Machine
Windows 10 (64bit)
Specific Setup
For each of the below devices, I checked if enabling the specific USB on the guest provided me access to the serial port. This worked for all below devices except the Uniden SDS 100.
Note: Always connect your device directly to the host. Do NOT connect through a USB hub.
Uniden SDS100
Audio Setup
Host setup: Regarding logged user permissions, I added the user to the audio group. This only needs to be done if listening to the scanner on the guest device. Once I figure out a good experience on the host I will remove this group from the user and stop listen on the guest machine.
Additional virtual machine settings: In order to listen to the scanners audio I had to choose the USB 3.0 option. Note: I'm using a Presonus Studio 24c USB audio interface.
Being able to listen to the scanner on my computer is great cause my computer is connected to all my Sonos speakers throughout the house.
Serial Setup
I use the BCDx36HP Sentinel programming software, BuTel ARCH536 and Proscan.
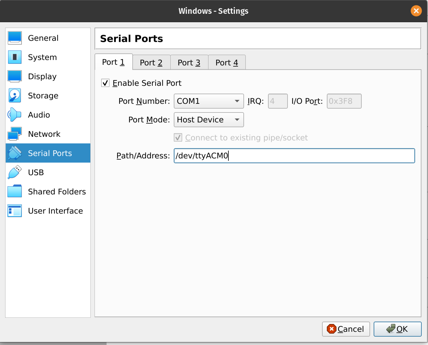
Like I said above, for some reason, I was not able to use the USB virtual machine settings for this device. In order to get this device to connect to the above applications, I had to grant access (via virtual machine settings) to the serial port on my host. I also had to make sure the specific device's USB was not enabled in the virtual machine.
Getting it done
1. First figure out what communications port is being used by the host for the device. I'm using Linux so I executed the following command:
sudo dmesg | grep tty
My port is ttyACM0. It should be noted that this port can change.
2. Using virtual machine settings enable serial and update as follows:

The above configuration will map host's ttyACM0 to guest's COM1, so make sure you pick a guest port that is not in use. Some common comm port error codes are as follows:
- 8005: Port is in use by another process. Potential solution: Check that comm port is not already in use by looking at the device manager and showing hidden devices via View menu settings. If one exists delete (if not in use) else update virtual machine settings to use another port.
- 8012: Port is not open or is unavailable. Potential solution: This could be a misconfiguration, double check your settings
Note: When a serial port on the virtual machine is enabled, always make sure it exists prior to starting the virtual machine. If the port doesn't exists, the virtual machine will fail to start.
The rest of the devices did not have a problem using the virtual machine's USB settings, but I'm including them here to show that I got them to work.
Anytone 878uii Plus
This handheld transceiver uses the D878UVII (v2.05) software.
Anytone 578uiii Plus
This mobile transceiver uses the D578UV (v1.16) software.
Yaesu FT3DR
I use the RT Systems programming software for this handheld transceiver.
Yaesu FTM-400XDR
I use the RT Systems programming software for this mobile transceiver.
Yaesu VX-6R
I use Chirp programming software for this handheld transceiver.
Baofeng BF-F8HP
I use Chirp programming software for this handheld transceiver.
Wouxun KG-905G
This handheld transceiver uses the KG-905G software.
Radioddity DB25-G
I use Chirp programming software for this mobile transceiver.
Radioddity QB25
I use Chirp programming software for this mobile transceiver.

Comments